Showing posts with label burning. Show all posts

Friday, 1 February 2013

Warm fuzzies

The other day I heard someone describe teaching as something that could either give you "warm fuzzies" or "cold pricklies".

Wednesday and Thursday were definitely warm fuzzies!

I forgot (as always) my camera for Wednesday, so I'll have to grab some pictures next time.  We are approaching the end of the City & Guilds course and there is some utterly fabulous work emerging.  I am stunned at what people have been able to go away and do after a session of vague and waffly teaching with me...(well, it feels vague and waffly to me sometimes!  I get side-tracked by ideas).  Promise photos next week...

Meanwhile, on Thursday we have been making holes in things.  Someone told me a while back to confront my fear of teaching with craft tools that could potentially burn down the building, as it was fun...and I think I'm finally convinced!

Here is my original sample (in a sudden flash of inspiration it is backed with FOIL - I have after all got quite a lot of the stuff)


And here is Ann's piece, pre-burning of the holes - this is Ann who said she was no good at free machining...I beg to differ:


Angela's (also pre-burning).  I love the frayed edges of the silk that Angela has used:


And Carole has been very busy, displaying her work beautifully in a hard-backed book:


And Sheila has also conquered free machining and produced some beautiful work:


Now that we've burnt holes in anything that will stand still long enough, we've started to play with shirring elastic:


The Girl has also been stitching cut-through circles for her plant cell quilt:
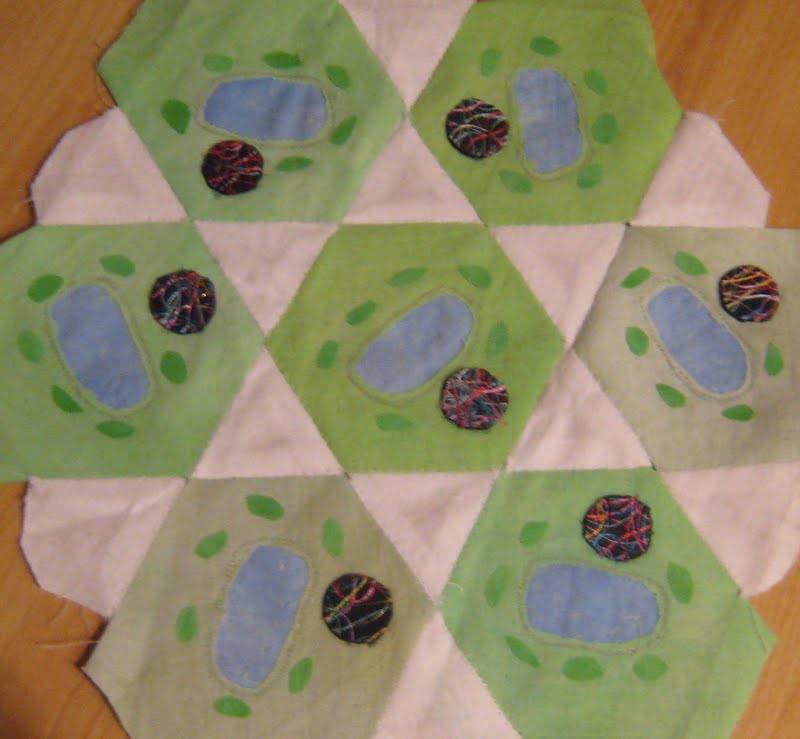

Girl tacked all the hexagons, I did the triangles (because the points were fraying) and then Girl stitched it all together by hand, and free-machined and cut away the blue vacuoles.  All nuclei and chloroplasts also stitched on by Girl's hand.  Since this (blurry) photo, I have stitched it up with wadding and a backing, and Girl will machine quilt it next time I can grab her to come and use the sewing machine...

Science homework isn't what it was in my day...

FINALLY we also managed a spot of tray-dyeing in class yesterday (no wonder the car was laden to the roof!)


Sneak preview...


I haven't ironed it yet...

Monday, 6 February 2012

Flurries

of creativity, not MORE snow! 
(I have to keep checking the view of the streetlight from my kitchen window, to check it isn't SNOWING again!)

The random pile of metal strips and bits from last Saturday refused to be tidied up, so I made a sort of pot/vessel/crusty bag:


Here it is mid-stitch:


Ann said that some of the copper looked a bit thick to stitch


and she wasn't wrong. 
Hence the big stitches on some of the pieces!  It all got a bit "clonky" (technical term).

I cut away the corners, stitched them together to draw it up into a pot/bag/vessel/container, then went at it with the heat gun.  It wasn't pulling in enough at the top, so I thought that I could try and thread a thick copper wire through the strips and pull it up, a bit like a drawstring bag.  So I did.

I then realised that I could attach dingledangles (another technical term) to the copper wire with thinner copper wires:


And here is the underneath, showing the weaving:


I'm not normally a burny-melty sort of gal, but I was quite pleased with this. 
I try and avoid using man-made/oil-based fabrics (nylon sheers etc) due to my (selective) ecowarrier ethics, so I was pleased to rediscover metal as a material. 
(Not sure about the acrylic felt though...I think that's what I mean by selective ethics.  And to be honest if I continued in this line of thinking I'd have to question the origin of the copper shim...and the beads...)

Moving on, another flurry of activity, from something I've never made before, to something I make all the time:


I can't remember if I've posted THE definitive no-knead recipe and technique, but I reckon I've absolutely perfected this!  I usually start the recipe at about 6pm in the evening and bake the loaves before school (if I'm organised) or after first dog walk (if I'm running late).

480g bread flour (I use half and half wholemeal and white)
1/4 teaspoon dried yeast (Doves Farm)
1 teaspoon salt
360ml water (room temperature, from the filter jug)

Mix the yeast and salt into the flour with a knife.  Add the water and mix it all together with the knife until there are no dry floury bits left - I do a sort of slice and flip motion with the knife.  There is absolutely no need to knead....Put a cover over the bowl eg. shower cap, clingfilm, dinner plate, and leave at room temperature for 12 hours plus.  Last week it was incredibly cold in the kitchen, so I put it in the airing cupboard.

Flour your worktop, and scrape the dough out of the bowl.  Flop it over once or twice using a stiff spatula or dough scraper, to form a big ball of dough - be careful with it, it is soft and squidgy and beautiful.  Cut it into two equal pieces, then turn each one around with both hands on the floured surface, gently bringing the rough edges underneath to form a soft, smooth ball of dough.  Place each ball on a teflon baking sheet, at diagonals to each other (so they both fit on one baking sheet).  Sprinkle each ball with flour.
Put the timer on for 20 minutes (30 if your room is cold).
When it pings, put a baking tray in the oven and turn it on to max ie. 230C and set the timer again for 20.
After it pings, use a serrated knife to score a cross about 2cm deep in the top of each loaf.  I use my bread knife.  Carefully slide the teflon sheet of loaves onto the hot baking sheet, return to the oven and bake for 10 minutes.  After 10 minutes, turn down heat to 200C and bake for another 20 minutes. 
When loaves come out, I usually tap the excess flour off the tops.
Leave to cool for at least an hour.
Yum.

I also made a cake:


A partially invented apple & almond cake recipe. 
It sank in the middle, but there doesn't seem to be any left now...

I have also started on yet another mammoth procrastination exercise (but this one does at least involve stitch).  To be revealed another time!